
We all know we judge books by their covers.
Whether your browsing through Goodreads, skimming over ebooks, or drifting through the library a good cover makes you want to read the synopsis. It can convince you a book might be more interesting than it sounds. When you’ve got a rockin’ novel, you want an equally great book cover!
Covers are a different beast, though, than any other part of publishing your novel. Most authors can figure out how to format their ebook and paperback as well as how to write their synopsis and bio. Creating a book cover, however, doesn’t involve words or writing or formatting.
Covers are the most likely area a DIY author will choose not to do it themselves.
Because it’s a different skill set altogether. If you don’t have much (or any) photo editing experience plenty of designers sell either pre-made book covers or offer custom work. Check out the Resources page for just a few options. This is a DIY series though, so let’s delve into the nuts and bolts of creating your own cover!
If you’re not sure exactly where to start creating your book cover, look at covers you love. Identify what you like about them, whether it’s the cover model, the colors, the fonts or simply the tone. Then figure out how you can apply that to your cover.
Also keep in mind that different genres tend to have a certain vibe to them. You, of course, want your cover to be unique. But you also want your audience to know at a quick glance if it’s dystopian or high fantasy or contemporary romance. Fortunately for me, girls in gorgeous dresses fit the tone of fairy tale and fantasy novels. Because I love covers with big dresses.
Resources
Software and Sizes
I assume you have some software you’re familiar with that you’ll be using. I use PhotoImpact, not Photoshop. I’ve also heard of GIMP which is free photo editing software, but I haven’t tried it.
Before I start any new project, I check ebookindiecovers’ information on ebook cover sizes since Melody does a great job of keeping her information up to date. You can also use Canva to start with a base ebook image and then use another photo editor to get fancy.
Once all is said and done, it’s good to save 400×600 and 200×300 versions. Smaller sizes work great for website graphics, Goodreads, Book Bub, and other places you don’t need a larger file.
Speaking of size, you need a file size less than 2MB for Barnes & Noble if you’re releasing a Nook version.
Source Images
Always, always, always make sure you own the images you use or that you have permission to use them.
A quick search will give you different places to find stock images. The cost of the image will vary, obviously, on what you choose and how many images you need.

DeviantArt is also a good resource for stock images. Many of the creators will ask for a licensing fee for commercial use but it’s generally quite reasonable. I found the cover models for both Tattered Heart and Enchanted Storms on DeviantArt and I used my own photography for the background images.
Fonts
Fonts are easy to take for granted, but often they’re copyrighted as much as images. It’s important to find public domain fonts so you don’t have to worry about copyright infringement. Or, if you find a font you must have, reach out to the creator for permission and pay the appropriate license fee.
1001 Fonts is a good resource for fonts available for commercial use. You’ll likely want a few you can work with so you have a different font for the book title and your author byline.
Once you’ve got all the pieces together you’re ready to get started.
Keep your Layers
That is probably photo editing 101, in the same vein as ‘save early, save often.’ But I learned my lesson the hard way so it’s worth it to warn you.
You are going to have to merge layers at some point during your process. But it’s good to strategize the order that you add elements to your image and to keep some of them as separate layers as long as possible. Things like your title, your byline and background pieces you may want to edit apart from foreground pieces.
Why Layers
There are a few reasons you’ll want pieces of your cover even after it’s finished:
- You’re going to want pieces for marketing items (like bookmarks or social media headers).
I mixed and matched the background sky, the model and the title for Enchanted Storms in all sorts of places. - You’re also probably going to want pieces of the image for the back cover of your paperback.
- A png of your title with a transparent background is incredibly helpful!
- First, for the title page of your book. Using an image enables you to maintain a more interesting font that may not be available in ereaders instead of a text title defaulting to Ariel or something.
- Then you’ll want to use the title image on the spine of your paperback.
- And again, you’re going to want to use your title on social media headers, marketing items, book graphics–who knows all the fun places you’ll think of to use it.
- A vertical 3200×4800 image probably isn’t going to fit perfectly on a paperback template so you’ll want to be able to move your foreground, background, title and byline individually.
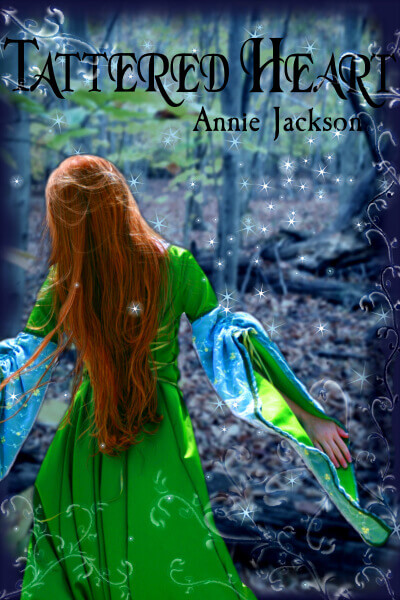
The biggest issue I had with Tattered Heart was adjusting the ebook image to fit within the boundaries of a paperback cover. I couldn’t get the image and the title to both fit correctly and since they were merged, I was rather stuck. In the end, I sized the whole thing to fit the title, then added new elements at the edges in order to fill it out and look good with the boundaries.
In the end, you’ll want 2 versions of your cover (layered and fully merged jpg).
Paperback Cover
Since the paperback has both a front and back, it’s a bit more involved. I recommend waiting until you get all the way through publishing your ebook and then coming back around to the paperback cover which is why it’s covered separately in the section on publishing your paperback.
Cover Reveal
The great thing about your book cover is that it exists independently of your novel. You can create (and release) it any time you want ahead of your novel.
I tend to wait until my penultimate draft because then I have a really solid sense of the novel. But that means my cover is only revealed about a month before I release the book. My marketing efforts for the novel’s release pile right on the heels of the cover reveal.
There’s no reason you can’t do it earlier in the lifecycle of the book and enjoy your own cover as inspiration to keep writing!
Would you try your hand at creating your own cover? Do you have any favorite book covers you might use for inspiration?

Great post, thank you so much!